
CUISINART Ice Cream Maker, Ice Cream and Frozen Yogurt Machine, 2-Qt. Double-Insulated Freezer Bowl, Silver, ICE30BCP1
53

Product Images


Product Features
- DOUBLE-INSULATED FREEZER BOWL: This Cuisinart Cuisinart Ice Cream Maker Machine with double-insulated freezer bowl holds a generous 2 quarts of your favorite frozen dessert treats, including ice cream, frozen yogurt, sorbet, sherbet, and frozen drinks.
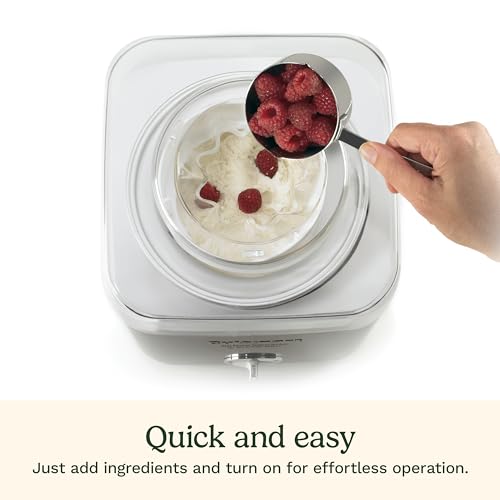
- SUPERIOR FUNCTIONALITY: The brushed stainless steel ice cream machine features a fully automatic heavy-duty motor to make frozen desserts or drinks in under 30 minutes.
- MUST-HAVE FEATURES: Large ingredient spout for easily adding favorite mix-ins, including retractable cord storage that keeps countertops clutter-free.
- WHAT’S INCLUDED: Frozen yogurt machine comes with a replacement lid, double-insulated freezer bowl that holds up to 2 quarts of frozen dessert, paddle, instructions, and a recipe book.
- LIMITED 3-YEAR WARRANTY: The BPA-free Cuisinart Ice Cream Maker Machine ICE30BCP1 comes with a limited 3-year warranty.
- DOUBLE-INSULATED FREEZER BOWL: This Cuisinart Cuisinart Ice Cream Maker Machine with double-insulated freezer bowl holds a generous 2 quarts of your favorite frozen dessert treats, including ice cream, frozen yogurt, sorbet, sherbet, and frozen drinks.
- SUPERIOR FUNCTIONALITY: The brushed stainless steel ice cream machine features a fully automatic heavy-duty motor to make frozen desserts or drinks in under 30 minutes.
- MUST-HAVE FEATURES: Large ingredient spout for easily adding favorite mix-ins, including retractable cord storage that keeps countertops clutter-free.
- WHAT’S INCLUDED: Frozen yogurt machine comes with a double-insulated freezer bowl that holds up to 2 quarts of frozen dessert, paddle, instructions, and a recipe book.
- LIMITED 3-YEAR WARRANTY: The BPA-free Cuisinart Ice Cream Maker Machine ICE30BCP1 comes with a limited 3-year warranty.
Product Specifications
| Brand Name | Cuisinart |
| Included Components | Ice Cream Maker |
| Model Name | Ice Cream Maker |
| Model Number | ICE-30BCP1ES |
| Recommended Uses For Product | Residential |
| Warranty Description | 3 Year limited warranty |
| UPC | 086279168009 |
| Manufacturer | Cuisinart |
| Part Number | ICE-30BCP1 |
| Unit Count | 1 Count |
| Item Type Name | Ice Cream Maker |
| ASIN | B0006ONQOC |
| Capacity | 2 quarts |
| Item Dimensions L x W x H | 8.5"L x 8.3"W x 11.5"H |
| Item Weight | 1.8 Kilograms |
| Other Special Features of the Product | Programmable |
| Operation Mode | Automatic |
| Material | Plastic, Stainless Steel |
| Product Care Instructions | Hand Wash Only |
| Color | Brushed Chrome |
Product Price History
-


Great ice cream machine. I bought this ice cream machine in February and have made about 3 or 4 dozen batches with it by now. It’s fantastic! You pour in the custard, switch it to “on”, go find something to do for half an hour, and come back to ice cream.Upon reading the other reviews, I’d like to specify a few things for people who, like me, haven’t owned an ice cream machine before and want to know what to expect when they make a batch.1. Freeze your bowl completely, for 24 hours, as directed. If your bowl isn’t completely frozen, your ice cream won’t churn properly. There’s no shortcut around this. I prefer to keep my bowl in the freezer all the time if I think the whim to make ice cream will strike me. If your bowl is room-temperature and you want to make a batch today, it’s just not going to happen, so include bowl-chilling time in your planning.2. When you’re done churning, your ice cream will be soft-serve consistency. This is normal. Trust me, you want it to be that way or it’d be difficult to get out of the machine to transfer into a container–I find that I have about 3-4 minutes to make the transfer, or the ice cream on the sides and bottom are very hard to get out. When you’ve put your ice cream into your Gladware or whatever you’re using (I like OXO’s freezer-proof containers) then it’ll harden up in an hour or two.3. Don’t touch the metal part of the frozen bowl, especially if your hands are wet. Ouch. Seriously, the frozen metal will freeze water to it in a matter of seconds. It’ll do the same to your skin. By the same token, don’t wash the freezer bowl until you’ve run it under very hot water for a few minutes or let it defrost for an hour or two. The water residue will freeze to ice (and give your next batch freezer-burn flavor if you store the bowl in the freezer) and whatever towel or paper towel you use to dry it will freeze lint balls to the metal. Not a desirable result.4. Making your own custard is actually pretty easy. You don’t need a double-boiler, a regular saucepan will do fine, and despite what the ice cream books will tell you, you do not need to watch the custard like a nuclear scientist. You still have to stand there and stir it, and you don’t want to let it boil, but it’s not a case of “Oh, I let it go for 2 seconds, it’s ruined.” It’s not a souffle. Personally, I’ve found that a slightly overcooked custard (i.e. a little clumpy on the bottom of the pan when you pour it in the strainer) makes a superior result. I like to make my custard at night, chill overnight in the fridge, and churn in the morning.5. Remember to stir your custard thoroughly before adding it to the churn (some recipes separate a little during the chilling process) and do NOT use more than a half cup of mix-ins for a full 2-quart batch, or you’ll get overflow. A half cup doesn’t sound like much but it really is.Pick up a copy of Leibovitz’s “The Perfect Scoop”. It has fantastic recipes, great tips on making a successful custard, and also has tons of recipes for making your own mix-ins. Just a great source for all ice cream-related things overall. I’ve got a few ice cream recipe books and I think this one is the best.
Excellent ice cream machine, know how to take care of it, you will be rewarded. This is a very good ice cream machine for its class (home use, freezer bowl). I’d owned the 1 1/2 quart Cusinart model and liked it a lot. Then someone in my house put the drum in the dishwasher and I found out when I tried to make a batch of ice cream that wouldn’t freeze. Using the 1 1/2 quart model I was always scaling down recipes or hovering over the ice cream as it churned with a spoon, stealing spoonfuls ice cream as it threatened to overflow the ice cream maker because I overfilled it (not that I really minded that). I like the 2 quart size for those reasons,If you’ve never owned one of these types of ice cream makers before, here’s an overview. There are two main parts as far as what makes the ice cream. There is a paddle and a drum, aka the freezer bowl. The night before you intend to make ice cream (or earlier) park your clean freezer bowl in the coldest part of your freezer overnight. This is essential that the bowl be frozen through with no sloshing sound. This drum is what chills the ice cream.When you’re ready to make the ice cream, put the frozen freezer bowl into the base of the ice cream machine, put the paddle in and put the top on, start the machine and then pour your cold (repeat COLD) ice cream mixture into the freezer bowl as it runs. The cold of the freezer bowl chills the ice cream mixture, the paddle scraps the sides of the freezer bowl as it turns which scrapes off the freezing ice cream incorporating it back into the ice cream mixture and churns air into the mixture. Let the machine run for 20ish minutes. Give it a peak every once in a while because watched ice cream never freezes ;). When it’s done, you’ll hear the motor struggle a bit more because of the thickness of the ice cream, the ice cream will be soft serve consistency and will be done as far as its adventure with the machine. From here you could eat it as soft serve, or scoop out the ice cream into a freezer safe container and freeze it for a few hours. let the freezer bowl warm up a little, then wash by hand with warm soapy water and a soft sponge or cloth.The negative comments that people have left seem mostly to be due to them not understanding how this machine works or that they expected something different, or both. Yes, you have to freeze the bowl overnight — that’s how this type of ice cream machine chills ice cream. It doesnt have its own refridgeration unit. If you want that, then pay 5x+ the price for a different type of machine. No, this machine doesn’t produce solid hard ice cream — it produces soft serve consistency because it churns and you can’t churn rock solid ice cream. And You MUST WASH THE FREEZER BOWL BY HAND. This isn’t a “to keep it looking it’s best” issue like you sneak your pots and pans in the dishwasher even though you shouldn’t — the heat from the dishwasher will destroy the freezing liquid in the bowl and the bowl will never make ice cream again. You can tell that a well meaning relative put your bowl in the dishwasher because the bowl will still sound sloshy even though it’s been freezing for days.The It Never Froze My Ice Cream comments — the person either put their freezer bowl in the dishwasher or the bowl wasn’t cold enough. Or the freezer bowl was defective.The It Won’t Make Ice Cream Immediately, It Makes Soft Serve…comments — that’s true, but that’s how this machine works.Some have commented that they have to let the finished ice cream (after being I the freezer) sit on the counter for 15 minutes until they can scoop it. My suggestions are: 1. Use more fat in your recipe, 2. Let it churn more air as the machine runs, 3. Know that most commercial ice creams have a ton of what they call “overhead” which is basically air in the ice cream. You may notice that the same volume of two different brands of ice cream weigh differently. Ultra premium brands like Haagen Daaz have little overhead compared to, say most grocery store brands. Lower quality ice creams also have thickeners and stabilizers that hold the ice cream together but keep it from really forming solid. Ever leave a bowl of ice cream on the counter overnight and the next day it’s a little melted but mostly in the same shape? That’s the stabilizers. All of this makes commercial ice cream soft and easy to scoop even though it’s frozen. Take heart that better quality ice creams like the one you are making are naturally harder when frozen, and therefore may take a sturdy ice cream scoop and perhaps a little muscle to scoop. On properly made ice creams (enough fat, enough churning) I’ve never made a batch too hard to scoop straight from the freezer.In short, this machine works beautifully and its make quality ice cream. I’m very happy with it.
Excellent ice cream machine, know how to take care of it, you will be rewarded. This is a very good ice cream machine for its class (home use, freezer bowl). I’d owned the 1 1/2 quart Cusinart model and liked it a lot. Then someone in my house put the drum in the dishwasher and I found out when I tried to make a batch of ice cream that wouldn’t freeze. Using the 1 1/2 quart model I was always scaling down recipes or hovering over the ice cream as it churned with a spoon, stealing spoonfuls ice cream as it threatened to overflow the ice cream maker because I overfilled it (not that I really minded that). I like the 2 quart size for those reasons,If you’ve never owned one of these types of ice cream makers before, here’s an overview. There are two main parts as far as what makes the ice cream. There is a paddle and a drum, aka the freezer bowl. The night before you intend to make ice cream (or earlier) park your clean freezer bowl in the coldest part of your freezer overnight. This is essential that the bowl be frozen through with no sloshing sound. This drum is what chills the ice cream.When you’re ready to make the ice cream, put the frozen freezer bowl into the base of the ice cream machine, put the paddle in and put the top on, start the machine and then pour your cold (repeat COLD) ice cream mixture into the freezer bowl as it runs. The cold of the freezer bowl chills the ice cream mixture, the paddle scraps the sides of the freezer bowl as it turns which scrapes off the freezing ice cream incorporating it back into the ice cream mixture and churns air into the mixture. Let the machine run for 20ish minutes. Give it a peak every once in a while because watched ice cream never freezes ;). When it’s done, you’ll hear the motor struggle a bit more because of the thickness of the ice cream, the ice cream will be soft serve consistency and will be done as far as its adventure with the machine. From here you could eat it as soft serve, or scoop out the ice cream into a freezer safe container and freeze it for a few hours. let the freezer bowl warm up a little, then wash by hand with warm soapy water and a soft sponge or cloth.The negative comments that people have left seem mostly to be due to them not understanding how this machine works or that they expected something different, or both. Yes, you have to freeze the bowl overnight — that’s how this type of ice cream machine chills ice cream. It doesnt have its own refridgeration unit. If you want that, then pay 5x+ the price for a different type of machine. No, this machine doesn’t produce solid hard ice cream — it produces soft serve consistency because it churns and you can’t churn rock solid ice cream. And You MUST WASH THE FREEZER BOWL BY HAND. This isn’t a “to keep it looking it’s best” issue like you sneak your pots and pans in the dishwasher even though you shouldn’t — the heat from the dishwasher will destroy the freezing liquid in the bowl and the bowl will never make ice cream again. You can tell that a well meaning relative put your bowl in the dishwasher because the bowl will still sound sloshy even though it’s been freezing for days.The It Never Froze My Ice Cream comments — the person either put their freezer bowl in the dishwasher or the bowl wasn’t cold enough. Or the freezer bowl was defective.The It Won’t Make Ice Cream Immediately, It Makes Soft Serve…comments — that’s true, but that’s how this machine works.Some have commented that they have to let the finished ice cream (after being I the freezer) sit on the counter for 15 minutes until they can scoop it. My suggestions are: 1. Use more fat in your recipe, 2. Let it churn more air as the machine runs, 3. Know that most commercial ice creams have a ton of what they call “overhead” which is basically air in the ice cream. You may notice that the same volume of two different brands of ice cream weigh differently. Ultra premium brands like Haagen Daaz have little overhead compared to, say most grocery store brands. Lower quality ice creams also have thickeners and stabilizers that hold the ice cream together but keep it from really forming solid. Ever leave a bowl of ice cream on the counter overnight and the next day it’s a little melted but mostly in the same shape? That’s the stabilizers. All of this makes commercial ice cream soft and easy to scoop even though it’s frozen. Take heart that better quality ice creams like the one you are making are naturally harder when frozen, and therefore may take a sturdy ice cream scoop and perhaps a little muscle to scoop. On properly made ice creams (enough fat, enough churning) I’ve never made a batch too hard to scoop straight from the freezer.In short, this machine works beautifully and its make quality ice cream. I’m very happy with it.
Excellent ice cream machine, know how to take care of it, you will be rewarded. This is a very good ice cream machine for its class (home use, freezer bowl). I’d owned the 1 1/2 quart Cusinart model and liked it a lot. Then someone in my house put the drum in the dishwasher and I found out when I tried to make a batch of ice cream that wouldn’t freeze. Using the 1 1/2 quart model I was always scaling down recipes or hovering over the ice cream as it churned with a spoon, stealing spoonfuls ice cream as it threatened to overflow the ice cream maker because I overfilled it (not that I really minded that). I like the 2 quart size for those reasons,If you’ve never owned one of these types of ice cream makers before, here’s an overview. There are two main parts as far as what makes the ice cream. There is a paddle and a drum, aka the freezer bowl. The night before you intend to make ice cream (or earlier) park your clean freezer bowl in the coldest part of your freezer overnight. This is essential that the bowl be frozen through with no sloshing sound. This drum is what chills the ice cream.When you’re ready to make the ice cream, put the frozen freezer bowl into the base of the ice cream machine, put the paddle in and put the top on, start the machine and then pour your cold (repeat COLD) ice cream mixture into the freezer bowl as it runs. The cold of the freezer bowl chills the ice cream mixture, the paddle scraps the sides of the freezer bowl as it turns which scrapes off the freezing ice cream incorporating it back into the ice cream mixture and churns air into the mixture. Let the machine run for 20ish minutes. Give it a peak every once in a while because watched ice cream never freezes ;). When it’s done, you’ll hear the motor struggle a bit more because of the thickness of the ice cream, the ice cream will be soft serve consistency and will be done as far as its adventure with the machine. From here you could eat it as soft serve, or scoop out the ice cream into a freezer safe container and freeze it for a few hours. let the freezer bowl warm up a little, then wash by hand with warm soapy water and a soft sponge or cloth.The negative comments that people have left seem mostly to be due to them not understanding how this machine works or that they expected something different, or both. Yes, you have to freeze the bowl overnight — that’s how this type of ice cream machine chills ice cream. It doesnt have its own refridgeration unit. If you want that, then pay 5x+ the price for a different type of machine. No, this machine doesn’t produce solid hard ice cream — it produces soft serve consistency because it churns and you can’t churn rock solid ice cream. And You MUST WASH THE FREEZER BOWL BY HAND. This isn’t a “to keep it looking it’s best” issue like you sneak your pots and pans in the dishwasher even though you shouldn’t — the heat from the dishwasher will destroy the freezing liquid in the bowl and the bowl will never make ice cream again. You can tell that a well meaning relative put your bowl in the dishwasher because the bowl will still sound sloshy even though it’s been freezing for days.The It Never Froze My Ice Cream comments — the person either put their freezer bowl in the dishwasher or the bowl wasn’t cold enough. Or the freezer bowl was defective.The It Won’t Make Ice Cream Immediately, It Makes Soft Serve…comments — that’s true, but that’s how this machine works.Some have commented that they have to let the finished ice cream (after being I the freezer) sit on the counter for 15 minutes until they can scoop it. My suggestions are: 1. Use more fat in your recipe, 2. Let it churn more air as the machine runs, 3. Know that most commercial ice creams have a ton of what they call “overhead” which is basically air in the ice cream. You may notice that the same volume of two different brands of ice cream weigh differently. Ultra premium brands like Haagen Daaz have little overhead compared to, say most grocery store brands. Lower quality ice creams also have thickeners and stabilizers that hold the ice cream together but keep it from really forming solid. Ever leave a bowl of ice cream on the counter overnight and the next day it’s a little melted but mostly in the same shape? That’s the stabilizers. All of this makes commercial ice cream soft and easy to scoop even though it’s frozen. Take heart that better quality ice creams like the one you are making are naturally harder when frozen, and therefore may take a sturdy ice cream scoop and perhaps a little muscle to scoop. On properly made ice creams (enough fat, enough churning) I’ve never made a batch too hard to scoop straight from the freezer.In short, this machine works beautifully and its make quality ice cream. I’m very happy with it.
Excellent machine yielding very creamy ice cream but LOUD! Great for ice cream free of: gluten, dairy, egg, sugar & soy. I bought this icecream machine because we just found out that my son and daughter both have terrible allegies to milk, eggs, wheat and soy. We also do not eat refined sugar or processed food. We tried vegan + soy free ice creams that were about $10 a pint and whole foods and tasted terrible. this machine makes excellent ice cream. It’s very easy to use and it comes with a few recipes. to work it, basically, there is an “on” and “off” switch and that’s it. the reason why I gave it 4 stars is because of the NOISE!! holy cow, this thing is REALLY loud and given that it takes about 30-35 minutes for the ice cream to finish, that’s a really long time for a horribly loud machine. aside, from that, it churns out an excelent and very creamy ice cream product. It’s very easy to use and to clean.For those of you who might be interested in a gluten free, sugar free, dairy free, egg free, refined sugar free (honey) and soy free and incredibly creamy recipe that tastes heavenly, you are in for a treat (a frozed delicious one). Here’s the recipe:How To Make Vegan Ice CreamMakes 1 quart, serves 6 to 8What You NeedIngredients2 (13- to 15-ounce) cans full-fat coconut milk1/2 cup agave, maple syrup, honey, turbinado sugar, or cane sugar1/4 teaspoon salt2 tablespoons cornstarch (or 1 tablespoon arrowroot starch, i used cornstarch)1 1/2 – 2 teaspoons vanilla extract (i used 2)Optional extras: nuts, chocolate (or carob) chips, fruit puree, cacao nibs, etc.1 tsp great lakes unflavored gelatinEquipmentMeasuring cups and spoonsWhisk2-quart saucepanWooden spatulaGlass or plastic dish, for cooling the baseIce cream machine (at least 1 1/2 quart capacity)Plastic wrapFreezer container, like a loaf pan or pint containerParchment or wax paperInstructions→ At least 24 hours before you plan to churn the ice cream, put the ice cream machine’s bowl in the freezer to freeze. It should be frozen solid before using (you should hear no liquid sloshing inside when you shake it).Shake the coconut milk: Cans of coconut milk separate into a thick creamy layer and a thin watery layer on the shelf. Before opening them, shake the cans of coconut milk thoroughly to incorporate the layers.Set aside 1/2 cup coconut milk: Open the cans of coconut milk. Measure 1/2 cup and set this aside.Pour the coconut milk into a saucepan: Pour the remaining coconut milk into a 2-quart sauce pan.Add the sweetener and salt to the coconut milk: Measure the sweetener (agave, maple syrup, honey, or sugar). Add this to the coconut milk along with the salt.Warm the coconut milk on the stove: Warm the coconut milk on the stove over medium-low heat, stirring occasionally, until the sweetener has completely dissolved into the coconut milk, 1 to 2 minutes.Whisk the cornstarch into the reserved coconut milk: Measure the cornstarch and add it to the reserved 1/2 cup coconut milk. Whisk thoroughly until the cornstarch is totally dissolved.Add the cornstarch mixture to the coconut milk: Pour the cornstarch mixture into the warm coconut milk and the 1 tsp of great lakes gelatin while whisking gently.Heat the ice cream base until thickened: This is your ice cream base. Increase the heat to medium. Stirring occasionally, continue cooking the base until it has thickened enough to coat the back of a spoon, 6 to 10 minutes. Do not allow the base come to a boil.Stir in the vanilla: Remove the base from heat and stir in the vanilla.Chill the base: Pour the base into a shallow container. Let the base cool slightly on the counter so it’s not hot when you put it in the fridge. Before refrigerating, press a piece of plastic wrap against the surface — this coconut milk base doesn’t form a skin quite as badly as a milk-and-egg base, but it doesn’t hurt! Cover the container and refrigerate for at least 4 hours or for up to 3 days. I let mine sit in the refriderator for 1 night and let the container freeze also for the night.Begin churning the ice cream: Remove the base from the fridge. It should be completely chilled and slightly pudding-like in texture. Pour the base into your ice cream machine and begin churning.Churn until the ice cream is the consistency of soft-serve: Churn the ice cream until it thickens considerably and is roughly the consistency of soft-serve ice cream. Depending on your machine, this could take anywhere from 10 to 30 minutes (it took me exactly 30 minutes with this unit — keep an eye on it! If you want to add any extras, add them now and churn a few more seconds until they are fully incorporated.Transfer to freezer container: Scrape the ice cream into your freezer container. Press a piece of parchment or wax paper agains the surface to prevent ice crystals from forming.Freeze for at least 4 hours: Transfer the container of ice cream to the freezer and freeze for at least for hours to harden the ice cream.Warm slightly before serving: If your ice cream is too hard to scoop, let it warm a few minutes on the counter before scooping. I find that coconut ice cream melts a little more quickly than milk-based ice creams, so don’t wait too long!
Okay, so I want this review to be really informative so that it can help anyone who is considering to buy this but a little apprehensive. I must say the comments didnt look promising to me at all but since I have been eyeing this for quite a few months and I knew that at some point of time I would definitely have it in my kitchen,expensive.. sure but I just went ahead and bought this for my anniversary lol!So I had already read about someone whose machine unfortunately blew down due to the voltage problem (it being 110V needs a step down convertor) I also got a call from the seller informing me that I would need a convertor, which was really nice.So this got delivered to me in under 15 days amd went out and bought a step down convertor (100 watts just to be on the safe side) the day after.I had already seen many many ice cream recipes on youtube(laura vitale) samd had quite a few in mind but I went ahead with the mango ice cream since its summer already and I have been missing mangoes big time!I was really scared when I plugged my machine into the convertor and switched it on, to my relief it didnt blow up lolI must point out that I have a huge LG 4- door refrigerator so the freezer temperature wasnt a problem for me but as a measure I shook the frozen bowl and it was frozen solid so I knew that was a good starting point.I poured my custard bsased mixture that has been in the fridge for 4 hours and in the freezer for the last 15 min into the machine and within 15 min I could see that the texture was a hit! By 25 min the soft serve texture was achieved (for completely frozen ones you have to keep it in the freezer which is always mentioned everywhere even in the youtube videos) but I let it run for 4 extra min (total 29 min) just to be sure.I took out the icecream and it was delicious and of soft serve texture that we get in malls. I have now kept it in the freezer just to set conpletely and I am sure it would!So yeah I definitely love this machine and I am so excited about the different flavors I could make in this! Tomorrow I am gonna make vanilla chocolate chio ice cream 😉 the custard is already cooling in the fridge and the ice cream machine bowl in the freezer ;-)So its definitely a great buy, its no doubt expensive but for someone like me who loves to cook up and experiment with different recipes, its a great buy! I love it! I took some pics but cant find the attach pics button 🙁
Hace helado muy rápido y bien fácil, cualquiera la puede usar y en Internet hay tutoriales para las recetas. Yo hice una con leche condensada azúcar y café y quedó super rico y con solo 3 ingredientes. Me sorprende.
I can finally make vegan ice cream. Ok so I am reviewing for those that are either vegan or simply just dairy free because I decided to try my hand at it, even after reading reviews that were not favorable towards using plant milk. I am using this machine weekly now. For those that are wanting to do the dairy free route this is my base for each and every single recipe I’ve done:Vanilla based ice cream: 1 1/4 cup of plant milk, I’ve used soy and oat only at this point. And a 16.9 fluid ounce container of plant based heavy whipping cream. Country Crock came out with a game changer of one and it’s all I use in every recipe that calls for dairy heavy cream. UP TO (but can be less) 1/4 cup of agave.Chocolate based ice cream: 1 1/4 cup chocolate plant milk, ice used oat, soy and almond/coconut blend. And a 16.9 fluid ounce container of plant based heavy cream. UP TO (but can be less) 1/4 cup agave. That’s it.I’ve made cookies and cream by tossing in crushed Oreos in the vanilla base. I’ve done coffee ice cream several times using the chocolate base, vanilla extract and 4 tablespoons instant espresso powder. I’ve done starwberry using the vanilla base, vanilla extract, fresh strawberries & freeze dried strawberry powder that I bought here on Amazon. I’ve made mint and chip using vegan chocolate chips in the vanilla base, and a couple tablespoons of green spirulina powder (for natural green color) along with a teaspoon of peppermint extract. I’m going to make my own version of Ben and Jerry’s Cherry Garcia today using the chocolate base with frozen cherries. I have made Rocky Road several times using the chocolate base, adding vegan marshmallows, chopped and toasted almonds and 1/3 cup of cacao powder. The ones with cookies and candies require less agave. Keep that in mind. I’ve done a Lemon Blueberry with the vanilla base, lemon zest added after churning and blueberries, fresh and frozen both work great. If you use either of those bases, you will not fail. I will never pay $7 for a pint of vegan ice cream again that comes in only chocolate or vanilla and is packed with sugar.Side note: mix all of your ingredients in a bowl first (except when using citrus, add after churning) then pour into the machine while it’s on and spinning. Do NOT Pour ingredients in till after it’s running, otherwise it will freeze to the side instantly. When done, I use an offset frosting spatula to get all the ice cream off the sides. It rolls it like ice cream rolls, it’s amazing. Hope this helps and Happy Churning!!
Addicting. I imagine the plastic blade is going to break in the near future. It’s pretty weak. We’ll see how difficult and expensive a new one is. It basically gets frozen in there. And so you start tugging on it to pull out the ice cream and you just know its a matter of time before SNAP! So, I’m being careful. The ice cream maker is pretty easy. Look at the recipe book and modify it for what you have at home. You need to whip the cream a bit prior to pouring it into the machine or you’ll get less ice cream. I make whatever fruit is in season. So far peach, watermelon (it ruled!) and blackberry. Fig is next. Store ice cream in little jars because you can’t stop eating it until the jar is empty.
LOVE this thing. Absolutely love this ice cream maker! Really awesome to adjust the sweetness as well as the ingredients. Making ice cream is a breeze. Freeze the bowl for at least 24 hours, pour in the ingredients and turn on. Clean up is incredibly easy. As others have warned, do not put the freezer bowl in the dishwasher. I only wish the tolerance between the mixing blade and the sides of the bowl wall were tighter. I always have a frozen layer on the sides that don’t make it into my storage container. Do not scrape the sides with any metal trying to get the last bits. Only other down side is that the bowl will take up a good amount of space in your freezer. Still, if the maker broke down, I would purchase again.
Exactamente lo que dice ser… ¡¡una heladera!!uno muy bueno, 19 minutos para un helado casero perfecto y de elaboración tradicional, con un servicio suave y de firmeza media.Todos los que se quejan de que esto no es tan difícil como el helado comprado en la tienda no tienen ni idea de cómo debería verse y sentirse el helado hecho en casa.Cómo lo sé… 40 años haciendo helados, un tío dueño de su propia y famosa fábrica de helados en México, [Lo has comprado en el pasado, te lo garantizo].Un abuelo que trabajó en KRAFT durante más de 50 años en preparación de alimentos y recetas.por todas las reseñas de una estrella, especialmente la que analiza cada receta y le dice que no funcionará. O no tienes ni idea de cómo utilizar la máquina correctamente, o no estás siguiendo las instrucciones y/o tu refrigerador no es capaz de congelar el recipiente. SIMPLE COMO ESO.Todas mis recetas han salido perfectas… LO QUE recomendaría es…1. Enfríe la mezcla de helado en el refrigerador hasta que esté completamente fría. Esto puede tardar varias horas dependiendo de lo viejo que sea su refrigerador. Estoy bastante seguro de que ninguno de ustedes ha hecho reparar sus refrigeradores desde que los compraron… ;Op2. Enfríe el recipiente para congelar en el congelador durante al menos 24 horas la primera vez, para que no escuche el movimiento del líquido cuando lo agite.3. Coloque el fondo del recipiente de enfriamiento detrás del congelador.4. Cuando esté listo para hacer helado, tenga todos los ingredientes listos para que cuando saque el intestino frío esté listo para llenarlo y encenderlo para batir el helado en menos de 2 minutos.5. Asegúrate de que tu cocina no esté caliente, como en Campeche, Acapulco, Veracruz, etc.6. Finalmente use una crema espesa de buena calidad, no LECHE o leche delicia… se llama ICE-CREAM, no leche helada.Limpiar es fácil, para la revisión a la que no le gustó limpiar la paleta, ¡deténgase, por favor!¡Todos los electrodomésticos después de su uso necesitan limpieza en la cocina!Para la revisión que decía que esto es solo un granizado congelado y una paleta para rasparlo, puedes hacer esto en una batidora, MAL, no puedes, toda la técnica para hacer helado consiste en batir con paletas para romper los cristales de hielo. así se ha hecho durante más de 200 años.Diré que la mayoría de las reseñas negativas de una estrella en Amazon {80% o más} en todos los productos se deben a error o ignorancia del cliente. La mayoría de las reseñas de una estrella aquí se encuentran en esa situación.Se trata de una heladera sencilla, moderadamente silenciosa y fácil de usar. Como chef ejecutivo lo recomiendo.
Exactamente lo que dice ser… ¡¡una heladera!!uno muy bueno, 19 minutos para un helado casero perfecto y de elaboración tradicional, con un servicio suave y de firmeza media.Todos los que se quejan de que esto no es tan difícil como el helado comprado en la tienda no tienen ni idea de cómo debería verse y sentirse el helado hecho en casa.Cómo lo sé… 40 años haciendo helados, un tío dueño de su propia y famosa fábrica de helados en México, [Lo has comprado en el pasado, te lo garantizo].Un abuelo que trabajó en KRAFT durante más de 50 años en preparación de alimentos y recetas.por todas las reseñas de una estrella, especialmente la que analiza cada receta y le dice que no funcionará. O no tienes ni idea de cómo utilizar la máquina correctamente, o no estás siguiendo las instrucciones y/o tu refrigerador no es capaz de congelar el recipiente. SIMPLE COMO ESO.Todas mis recetas han salido perfectas… LO QUE recomendaría es…1. Enfríe la mezcla de helado en el refrigerador hasta que esté completamente fría. Esto puede tardar varias horas dependiendo de lo viejo que sea su refrigerador. Estoy bastante seguro de que ninguno de ustedes ha hecho reparar sus refrigeradores desde que los compraron… ;Op2. Enfríe el recipiente para congelar en el congelador durante al menos 24 horas la primera vez, para que no escuche el movimiento del líquido cuando lo agite.3. Coloque el fondo del recipiente de enfriamiento detrás del congelador.4. Cuando esté listo para hacer helado, tenga todos los ingredientes listos para que cuando saque el intestino frío esté listo para llenarlo y encenderlo para batir el helado en menos de 2 minutos.5. Asegúrate de que tu cocina no esté caliente, como en Campeche, Acapulco, Veracruz, etc.6. Finalmente use una crema espesa de buena calidad, no LECHE o leche delicia… se llama ICE-CREAM, no leche helada.Limpiar es fácil, para la revisión a la que no le gustó limpiar la paleta, ¡deténgase, por favor!¡Todos los electrodomésticos después de su uso necesitan limpieza en la cocina!Para la revisión que decía que esto es solo un granizado congelado y una paleta para rasparlo, puedes hacer esto en una batidora, MAL, no puedes, toda la técnica para hacer helado consiste en batir con paletas para romper los cristales de hielo. así se ha hecho durante más de 200 años.Diré que la mayoría de las reseñas negativas de una estrella en Amazon {80% o más} en todos los productos se deben a error o ignorancia del cliente. La mayoría de las reseñas de una estrella aquí se encuentran en esa situación.Se trata de una heladera sencilla, moderadamente silenciosa y fácil de usar. Como chef ejecutivo lo recomiendo.
Easy ice cream without the ice. This ice cream maker seemed like a good choice to replace an older one we had which leaked when our home lost power for weeks after a hurricane. (Apparently it got too hot and the gel pushed out of the seams.) We have some other Cuisinart appliances and they have performed well, so we stuck with the brand. So far, this machine has been a great replacement. It’s a bit larger than our old one, but it makes more ice cream, so that isn’t a big deal. Like most machines of this type, you have to put the core into the freezer overnight. You should leave it there until you have your mixture ready to go.I’m going to pick some nits now. I wish there was a marker or some guidance on how much mixture you should use. So far it has overflowed every time even when I made sure the mixture was well below the top of the core. The ice cream expands upward and out of the filling hole. It hasn’t been enough to overflow, but it did make a mess around the core. I’m not sure you can make a full 2 quarts of ice cream without making a mess like this.The stirring blades are a bit difficult to get all the ice cream out of and to clean. This is actually pretty normal though. I remember the old hand cranked machines were like this too. The rest of the machine is very easy to clean.There is no timer or auto shut off, so you have to monitor it yourself, which you should anyway. It performs just as it says. It will make ice cream in about 30 minutes. I let it run 45 minutes one time and that was too much. Some of the ice cream froze hard down in the bottom of the core, so don’t run any more than 30-35 minutes.I wish it came with a cover because the opening in the top is exposed during storage. We covered ours with a plastic bag that we had on hand.On a positive note, the recipes in the manual are VERY good. I’ve found that you can use their strawberry recipe for just about any fruit ice cream. I used it to make some mango ice cream and boy, I’m going to gain some weight! 🙁 It’s sooo good!Overall I’m very pleased with this ice cream maker and would definitely buy it again.
Hands Down a Great Product. The media could not be loaded. First, I want to say that I’ve priced out quite a few 2 quart ice cream makers and this was definitely a great bargain. It’s really simple to use. There’s literally only four parts to putting it together. You can look at the pictures and do it. Is very compact that it fits on my counter perfectly without taking up a lot of counter space, which I need being a homemaker utilize every single available space. So I’ve never made ice cream from scratch before however Cuisinart has a manual online that I just googled and let me tell you the taste is perfect although I substituted vanilla abstract for vanilla bean paste whole other level. So I will say there’s not really a leakage however, you have to be mindful of how much mixture you pour in because it does tend to spill over kind of like the top, but not exactly there was barely any, but it does have a little leakage. Now the drum maybe about 5 pounds in weight give or take overall it’s not heavy.I just don’t like having to put it in the freezer and letting it stay overnight for up to 17 hours and taking it back out to use. It is a bit noisy, but nothing that I don’t think the normal ear can tolerate. I would highly recommend this to someone for personal use. I wanted to test it out. I’m thinking of adding ice cream to my menu. I’ve had quite a few ideas in my head so if I am, I’m definitely going to invest in one that has a compressor overall highly recommend.
Hands Down a Great Product. The media could not be loaded. First, I want to say that I’ve priced out quite a few 2 quart ice cream makers and this was definitely a great bargain. It’s really simple to use. There’s literally only four parts to putting it together. You can look at the pictures and do it. Is very compact that it fits on my counter perfectly without taking up a lot of counter space, which I need being a homemaker utilize every single available space. So I’ve never made ice cream from scratch before however Cuisinart has a manual online that I just googled and let me tell you the taste is perfect although I substituted vanilla abstract for vanilla bean paste whole other level. So I will say there’s not really a leakage however, you have to be mindful of how much mixture you pour in because it does tend to spill over kind of like the top, but not exactly there was barely any, but it does have a little leakage. Now the drum maybe about 5 pounds in weight give or take overall it’s not heavy.I just don’t like having to put it in the freezer and letting it stay overnight for up to 17 hours and taking it back out to use. It is a bit noisy, but nothing that I don’t think the normal ear can tolerate. I would highly recommend this to someone for personal use. I wanted to test it out. I’m thinking of adding ice cream to my menu. I’ve had quite a few ideas in my head so if I am, I’m definitely going to invest in one that has a compressor overall highly recommend.
Easy to use. I am very surprised how easy this ice cream machine is to use. We tried it the first time this past weekend. It turned out great. All the family liked the texture & flavor. Looking forward to trying more recipes. Very easy clean up. Clear directions on how to use the machine. Very happy with my purchase.
Great quality, works great. I’ve never made ice cream before I bought this. So glad that I did!I wanted something that was simple but worked well. I read through the reviews and decided to try it out.It’s a perfect size for us, doesn’t take up a ton of space. Makes enough for our house. Directions are easy to follow. Really a great little ice cream maker!I will probably end up ordering another bowl for it so I don’t have to wait for it to freeze again before making another batch.
Easy to Use. The machine is good quality, even the small parts. It’s very easy to put together and use. There’s only one switch, “on” or “off”. The noise isn’t bad. I place it in my kitchen while I’m in the other room. I can’t really hear it. I place the freezer drum in my freezer the night before and it’ll freezes the ice cream in about 30min (sometimes a little longer), like the manual says. However, the ice cream is more soft serve, but if you place it in the freezer it’ll get firm, this is said in the manual as well. It’s easy to clean. Overall the price point is good for this machine.
Really easy to use. Made really good ice cream. Just follow the instructions and it works great. Good, smooth operation, easy to clean up.
Works well. I read reviews on this and a couple said its loud. I don’t think it is. My stand mixer is louder. Besides, it runs for 30 minutes at the most. If you have children waiting for ice cream they likely will be squealing with excitement and mask the sound as they watch.It says to chill the bowl for 6 to 24 hours. If that isn’t completely frozen you won’t get the results you want. Make sure all your ingredients are COLD! Put any mix-ins in the fridge/freezer.The recipes that come with it are great and taste good. The vanilla was a bit to sweet for me so I reduced the sugar by half.Its very easy to use, assembled (bowl/paddle/lid) and it cleans up easilyI recommend this