
Cuisinart Ice Cream Maker Machine, 1.5 Quart Sorbet, Frozen Yogurt Maker, Double Insulated, White, ICE-21P1
85

Product Images


Product Features
- SUPERIOR FUNCTION: This Cuisinart Ice Cream Maker Machine features a mixing paddle that makes frozen treats in 20 minutes or less.
- COOL FEATURE: Double-insulated freezer bowl eliminates the need for ice.
- CAPACITY: This ice cream maker can produce up to 1.5 quarts of your favorite ice cream or frozen yogurt.
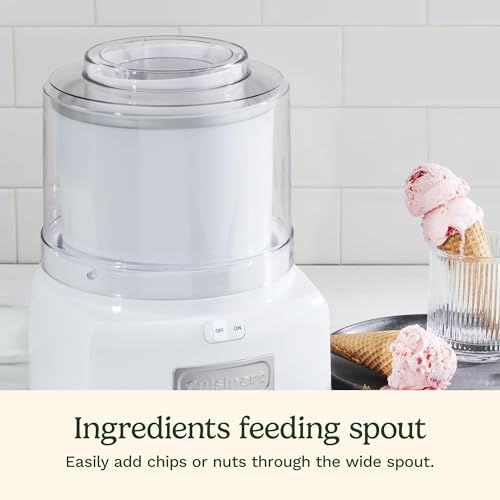
- EASY TO USE: Ice cream machine features an easy-lock transparent lid with large spout to make adding ingredients simple and mess free.
- LIMITED 3-YEAR WARRANTY: The BPA-free Cuisinart Ice Cream Maker Machine comes with a limited 3-year warranty.
- SUPERIOR FUNCTION: This Cuisinart Ice Cream Maker Machine features a mixing paddle that makes frozen treats in 20 minutes or less.
- COOL FEATURE: Double-insulated freezer bowl eliminates the need for ice.
- CAPACITY: This ice cream maker can produce up to 1-1/2 quarts of your favorite ice cream or frozen yogurt.
- EASY TO USE: Ice cream machine features an easy-lock transparent lid with large spout to make adding ingredients simple and mess free.
- LIMITED 3-YEAR WARRANTY: The BPA-free Cuisinart Ice Cream Maker Machine comes with a limited 3-year warranty.
Product Specifications
| Brand | Cuisinart |
| Color | White |
| Capacity | 1.5 Quarts |
| Special Feature | Double Insulated Freezer, Manual |
| Material | Plastic |
| Included Components | Ice-cream maker^plastic lid^freezer bowl, blade, bowl, lid |
| Model Name | 1.5 Quart Frozen Yogurt-Ice Cream Maker |
| Product Dimensions | 9.5"L x 9"W x 11.25"H |
| Item Weight | 9 Pounds |
| Operation Mode | Automatic |
| Product Care Instructions | Hand Wash |
| Recommended Uses For Product | Residential |
| Global Trade Identification Number | 10086279168099 |
| UPC | 086279168092 |
| Manufacturer | Cuisinart |
| Item Weight | 9 pounds |
| ASIN | B003KYSLMW |
| Item model number | ICE-21P1 |
| Is Discontinued By Manufacturer | No |
| Date First Available | May 19, 2010 |
Didn't find the right price? Set price alert below
Set Alert for Product: Cuisinart Ice Cream Maker Machine, 1.5 Quart Double Insulated Machine, Sorbet and Frozen Yogurt Maker, Ready in 20 Minutes, ICE-21P1, White - $6,432.81

Product Price History
-


Nice inexpensive Ice Cream machine. I received this item about two days later than the projected Amazon delivery date purchased from “Gourmet Kitchen Gallery”.The item itself consists of:1) Plug in base2) Frozen solution bowl that ingredients will pour in.3.) Plastic blade that slips into bowl and is held in placewhile the bowl spins by…4.) Clear plastic cover with hole at top to allow easy addition of ingredients.5.) Ice cream ingredient book.So far I’ve made the simple ice cream and sorbet recipes.I freeze the blade, the plastic cover and the bowl in the freezer 24 hours before use. I leave ingredients in teh freezer one hour prior to mixing. (although my apricot/ginger sorbet was still warm)The ice cream seemed to be wrapped up in about five minutes. The mixture bunches up and spills up (so it’s important to not overfill and I personally have started underfilling). As soon as it bunches up at the top, due to how the blade works, you’re not really going to get it mixed any further because it’s now bypassing the blade. It’s soft when I scoop it out and I usually place in fridge for a minimum of an hour before eating to let it harden. More cream=softer and less=harder for the simple ice cream ingredients. I have a peach ice cream that’s rock hard because I was trying a lower fat/sugar experiment. Still delicious, I just have to chip at it.The sorbet recipe is awesome. I use the raspberry and then just add whatever other fruit instead and play with flavors. It’s “creamy” (in regards to texture) after days in the fridge allowing easy scooping and VERY much like what you’d buy in the store. As mentioned the apricot/ginger was HOT when I placed in the freezer for an hour and still warm when I put into the ice cream maker. This took a solid 15 minutes to freeze vs the five minutes I experienced with the ice cream. I was impressed the ice cream maker still “froze it” though.The price is cheap, the portions are good for a couple or small family and it’s very easy to clean/use. I’m VERY happy with this purchase and glad the ice cream website I was looking at recommended it. In turn, I recommend it to you.Pros:Easy to cleanSimple to usenice recipe book although i’m sure there are better ice cream recipes/bases.InexpensiveDoesn’t require ice/rock saltCons:The piling up of the ice cream/sorbet when done annoys me. I own a heavier duty mixer that makes WAY too much and requires ice/rock salt. However, you can keep mixing it to a harder consistency (it also takes 2-3 hours). I think part of it is simply how the blades are made and they’re designed poorly. Still, this is my only complaint. It gets your ice cream to the point that your freezer can finish it for you.Notes:Cool ingredients prior to mixing and it speeds up the process.Don’t add alcohol (vanilla) until the very end. (this may be why i’m 5 minutes to done instead of 15ish)Freeze bowl overnight to make sure it’s frozen.When it bunches up you’re not going to get much more done so package and store.Vanilla extract REALLY isn’t needed when you do fruit ice cream. I ignore that ingredient.Sorbet recipe is AWESOME and comes out perfect.Enjoy. Sorbet is easy and fun to play with and doesn’t require ingredients you don’t normally have (sugar, water, fruit vs cream/eggs/whole milk/whatever else… i don’t drink whole milk or eat eggs and NEVER have cream).My recommendation is a strong buy. Nice cheap machine that works well. There are probably better out there, but I would expect a need to pay a lot more for them and frankly I don’t see the need when this works so well itself.
Slushy and Soft? Fixed With Better Freezing Methods. I have more of a problem with the manual than the machine, because it wasn’t the troubleshooting help it could have been. What did help was this page’s Question and Answer section, with all the user feedback!So my first batch didn’t turn out so well. I used half and half, sugar, salt, and vanilla extract. I’d have used regular cream, but I can’t find any pure heavy cream in my area that isn’t full of preservatives and additives containing free glutamic acid and other scary stuff.I froze the bowl for 14 hours. The gel was frozen solid. The manual said that the bowl should be in the freezer for 16-24 hours, but it also said that when you didn’t hear the liquid gel swishing, it was sufficiently frozen. So I thought optimistically, “Oh! That must mean my freezer’s just a super-freezer and got it cold enough in record time! Yay!” Um, no.I have learned that just because the gel is frozen, that doesn’t mean its temperature is as low as it can go – or should go. As I discovered, it needs to go a lot lower than “frozen solid” to work with this machine. Since it probably freezes around 32 degrees F (0 Celsius), the manual probably shouldn’t say to use the lack of swishing sound as an indicator to readiness. (It’s less misleading to say that hearing liquid is a definite sign it’s NOT ready.)The actual problem I encountered in my unsuccessful first try was that the mix stopped moving. Parts of it stayed on top of the paddle in a semi-frozen slushy state and parts of it remained on the sides, still unfrozen, and that was the stuff that wouldn’t freeze up at all. Since I was confident my bowl was cold enough (uh, yeah!) and the manual cautioned not to stick things in the bowl while the machine was on, I kept turning it off and moving the solid stuff to the sides, then turning it back on. Rather ungainly way to get what turned out to be a milkshake that, when frozen, turned into ice crystals.The next time, I did three things differently, and got very nice, acceptably smooth ice cream without omnipresent ice crystals.First, I used our non-self-defrosting freezer to chill the gel bowl. Freezers that are set to self defrost work by warming up every so often to control frost. Stand-alone freezers like chest freezers or upright freezers come in two styles: Self-defrosting and non-self-defrosting. We use the latter type, the one that has to be manually defrosted, because colder freezers are necessary for long-term storage of meat. A freezer that doesn’t self-defrost keeps its cold temperature steady, with the exception of when the freezer is opened or loses power. So I stuck the bowl in that one at the almost-coldest setting, 7 out of 8.Second, I chilled the mixture overnight in the fridge. Not sure that did anything much to improve things, because it seemed about the same amount of cold as my first try.The last thing I did differently was that while the ice cream machine was working, when parts of the mixture started freezing up on top, I used a rubber spatula to recirculate them. I kept using the spatula pretty vigorously the entire churning time. That worked well and was kinda fun.I was left with something that was definitely ice cream. Not slushy, not prone to melting at all. The ice cream didn’t melt instantly and the inner bowl was coated with a thin, hard-frozen layer of ice cream in places that stayed there. I rushed to get the ice cream into freezer containers, but I don’t think it was necessary this time. Whatever was in that bowl stayed frozen for a long, long time. Fifteen minutes later, I could still eat it frozen with a wooden spoon.So I came away the wiser and with better ice cream. Cold is key. I don’t think you need to use a non-self-defrosting freezer like I did, necessarily, but if you chill it the full 24 hours at the coldest setting and it still isn’t cold enough, it’s possible your self-defrosting freezer isn’t doing the job.I was left with two more tips to offer anyone who might be interested. One, if the bowl is that cold, don’t wash it right away, or it will freeze some of the washing water on it in an almost invisible layer. Two, I swear that bowl seemed cold enough to possibly make another batch. Had I had one ready, I’d have tried it. If I try it, I’ll report back.Hope that helps someone else who encounters the same problem of partially frozen slushy-milkshake ice cream. It’s most likely because the bowl isn’t cold enough.UPDATE 10/23/2014: Well, it’s the next day, and I am thrilled to report I got extra mileage out of the ice cream maker. I froze the bowl at the almost-coldest setting in my non-self-defrosting freezer for about 20 hours. I had a large batch of butterscotch ice cream mix ready and a small batch of coffee ice cream mix ready, my own recipes. I first ran the machine with the large batch for about 18 minutes. (I learned something important here: The larger batches circulate MUCH better than the smaller ones. This one hardly needed to be coaxed with the spatula. On the downside, there was so much aeration that I had to scoop out some at the top to prevent its warming up because it was leaving the icy part of the bowl.) Then I scooped most of the ice cream into a container and popped it in the freezer. I left a bit of the ice cream on the paddle, since the flavors weren’t bad to mix with the next batch and I wanted to preserve any coldness I could. I did not wash the bowl out for the same reason, and also because I didn’t want it warmed by delays or water. So I then reassembled everything and started the machine and added the small batch of coffee custard mix. It took about 12 minutes to freeze this mini-batch into gorgeous ice cream. Didn’t even start to melt. So I basically got 1 1/2 bowls out of one freezer day. Yay! Hopefully I didn’t do anything to risk the ice cream maker’s breaking – I was pretty careful to mix in the frozen part with the non-frozen part together.I learned something else here, too, that many of you must already know – the more fat, the more like store-bought ice cream. Half and half alone without cream or butter added wasn’t quite smooth enough, though it’s darn good. I thought it would work because some recipes in the book call for 2 cups milk and 2 cups cream, and it did make nice ice cream, but it occurred to me that I don’t know if half & half is half cream, half milk by weight or by volume. Anyone know?UPDATE 9/23/2021: It’s years later and it’s still working. Haven’t used it tons, but somewhat, with a variety of dairy and nondairy ice creams. Pretty pleased with this machine holding up and upgraded it two stars.UPDATE: 5/3/2023: My inner bowl is just starting to flake a bit on the rim, though I have taken a lot of care with washing it and not using abrasives. I found out an interesting factoid from the manufacturer whom I contacted. (Conair) They said of the inner bowl, “The bowl is aluminum covered with a xylan non-stick coating.” So apparently the part that comes in contact with the food is fluoropolymer-based and has similarities to Teflon and PTFE. If one were to heat it past a certain temperature, I presume it might not be safe for birds/parrots/avian pets who are nearby. But I imagine/hope that in its normal use, and washing in warm water, it would be fine.
WHAT’S NOT TO LIKE. Bought the Model 21 in time for homemade peach ice cream. Had gone back and forth whether to purchase a newer, more expensive version but after reading someone else’s recommendation that the older, simpler model worked just fine, decided to follow their advice and after having made nine batches of various flavors, agree that the “21” couldn’t be any better. No bells and whistles are really necessary other than the on/off switch, and it’s overly pricey to upgrade. The machine does make some noise, but not like a revved-up Harley or anything. I continue putzing around in the kitchen while the ice cream churns, and the high-pitched hum is not overly annoying. The slightly smaller capacity (1-1/2 qt) is advantageous since we can polish off a batch and go on to the next “experiment” without much delay. Finally, the smaller canister is easier to fit in a small refrigerator-freezer for the necessary pre-chilling. I haven’t found a second canister to be necessary for a small family, but if you have the freezer space and need to make larger quantities more often, it could be the ticket.This little gadget has been fun to use and it’s so easy, almost foolproof, to have great-tasting ice cream without the mess of an old-fashioned salt-and-ice freezer. After trying one of the Cuisinarts I ordered another as a gift, along with a 1-1/2 qt oblong storage container (have tried both Tovolo and Sumo—they seem practically identical). After the initial experiments with various “rich” recipes and flavors, we will probably try some of the lower cal versions such as sorbets and ices, but for now, it’s full bore with the creamy goodness. Life is now measured “before homemade ice cream” and after!Observations/methodology: Have tried various recipes—with eggs, cooked custard; with eggs, uncooked; no eggs, adding some instant vanilla pudding powder for extra thickness and body, and using fruits–peaches, cherries, strawberries, as well as butter pecan. (B.C. was hands-down fave!—toasted the chopped nuts in the oven first, with melted butter, a little sugar, and a sprinkling of kosher salt. In the custard, used dark brown sugar, maple syrup and Jack Daniels for flavoring—yummilicious!) Finally decided to stick with the cooked custard approach, adding a small amount of vanilla bean instant pudding powder, say 1-2 TB, to the cooled custard just prior to freezing. (I feel uneasy about using raw, uncooked eggs.) Have had excellent results using a Thermapen to measure the temp, whisking constantly while cooking in a heavy pot. It doesn’t take long to come to temp and thicken, but does need to be cooled prior to freezing, so if in a hurry you may prefer the easy-no-eggs-instant pudding type of recipe, readily available online.Not one batch so far has been a “failure”—in fact, they’re all so good that we’ve become addicted and eat ice cream three times a day. It should come with a warning label! We prefer a rich version, with a combination of heavy cream, evaporated milk, condensed milk and regular milk for a vanilla base resulting in that “from my childhood” taste. It can be modified with add-ins as you please. Be sure to write down what you do as you go, in case tweaking is needed next time or in case you pronounce the latest batch a sure winner. Have plenty of tasting spoons at the ready while churning, and several rubber spatulas will come in handy.As many have noted, it’s key to have the canister frozen rock-solid prior to churning. We keep it in the freezer between uses and even put the plastic shell (aka “lid”) in there while prepping the custard. There’s no actual lid as you might imagine. I wring out a wet dish towel and lay it on top across the open hole, and put some ice cubes atop that to help insulate. May not be necessary, but every bit helps.So far the “21” has worked great and we make a batch every other day. The most challenging part is transferring the just-frozen custard to a storage container for additional hardening. Take out the paddle first and scrape it off (another opportunity for tasting). The filled canister is heavy and to hold it with one hand while scraping out the soft ice cream is a bit unwieldy. A very firm plastic spatula works best (rather than a flexible one) to get all the ice cream out. Never use metal, anywhere, anytime! Wash and dry the canister when empty and return to your freezer pronto. You WILL want more ice cream soon and it’ll be ready to go, so keep a spot empty for it. It’ll be worth it. (I scream for green beans? Not so much….)Some have complained about the freezer not working for long, but being a new owner, I can’t say.. It seems like if you treat the parts gently it would last “forever,” but maybe that’s just like the honeymoon phase with a new lover. Time will tell but we’re very happy for now—even obsessed.Be cautious of OVER-filling the container which can cause an overflow mess since the mixture expands while freezing. Err on being conservative with the amount of custard mix. I use 2 eggs per 3 to 3-1/2 cups of liquid per batch and add the mixings the last few minutes to help ensure they don’t add too much volume. Keep an eye on it from time to time during the freezing process to make sure it isn’t about to overflow. You can always remove some of the mixture if it seems necessary. In the case of the toasted buttered pecans, I folded most of them into the mixture AFTER pouring it into the storage container because instructions say not to add anything larger than a chocolate chip, and I wanted some to be larger chunks. This delayed-addition technique works well for other fixings, too. On one hand, adding pureed fruits at the outset is good, for overall flavor intensity, but adding extra cut-up fruit later may be to your liking. Be aware that too-large chunks will likely get icy in the long run and be hard to scoop up, so there’s a fine line.The other “misteake” was making a double portion of custard in order to have back-to-back batches of half vanilla, intending to make another flavor with the remaining half of the mixture. Apparently the second half of the custard wasn’t chilled enough to overcome the freezing canister having gotten warmer on the first run. Although most batches froze in 15 to 30 minutes max, after a longer time it was obvious this batch refused to set up, so I returned the chilled custard in a bowl in the refrigerator, returned the canister to the freezer and decided to try again later. About five hours worked. Lesson learned—be patient. OK to double the batch, but chill it all thoroughly prior to churning.If pondering whether to get a countertop ice cream freezer, go for it. It’s fun and easy to use. You’ll be a proud as a brand-new parent after you make the first batch.
WHAT’S NOT TO LIKE. Bought the Model 21 in time for homemade peach ice cream. Had gone back and forth whether to purchase a newer, more expensive version but after reading someone else’s recommendation that the older, simpler model worked just fine, decided to follow their advice and after having made nine batches of various flavors, agree that the “21” couldn’t be any better. No bells and whistles are really necessary other than the on/off switch, and it’s overly pricey to upgrade. The machine does make some noise, but not like a revved-up Harley or anything. I continue putzing around in the kitchen while the ice cream churns, and the high-pitched hum is not overly annoying. The slightly smaller capacity (1-1/2 qt) is advantageous since we can polish off a batch and go on to the next “experiment” without much delay. Finally, the smaller canister is easier to fit in a small refrigerator-freezer for the necessary pre-chilling. I haven’t found a second canister to be necessary for a small family, but if you have the freezer space and need to make larger quantities more often, it could be the ticket.This little gadget has been fun to use and it’s so easy, almost foolproof, to have great-tasting ice cream without the mess of an old-fashioned salt-and-ice freezer. After trying one of the Cuisinarts I ordered another as a gift, along with a 1-1/2 qt oblong storage container (have tried both Tovolo and Sumo—they seem practically identical). After the initial experiments with various “rich” recipes and flavors, we will probably try some of the lower cal versions such as sorbets and ices, but for now, it’s full bore with the creamy goodness. Life is now measured “before homemade ice cream” and after!Observations/methodology: Have tried various recipes—with eggs, cooked custard; with eggs, uncooked; no eggs, adding some instant vanilla pudding powder for extra thickness and body, and using fruits–peaches, cherries, strawberries, as well as butter pecan. (B.C. was hands-down fave!—toasted the chopped nuts in the oven first, with melted butter, a little sugar, and a sprinkling of kosher salt. In the custard, used dark brown sugar, maple syrup and Jack Daniels for flavoring—yummilicious!) Finally decided to stick with the cooked custard approach, adding a small amount of vanilla bean instant pudding powder, say 1-2 TB, to the cooled custard just prior to freezing. (I feel uneasy about using raw, uncooked eggs.) Have had excellent results using a Thermapen to measure the temp, whisking constantly while cooking in a heavy pot. It doesn’t take long to come to temp and thicken, but does need to be cooled prior to freezing, so if in a hurry you may prefer the easy-no-eggs-instant pudding type of recipe, readily available online.Not one batch so far has been a “failure”—in fact, they’re all so good that we’ve become addicted and eat ice cream three times a day. It should come with a warning label! We prefer a rich version, with a combination of heavy cream, evaporated milk, condensed milk and regular milk for a vanilla base resulting in that “from my childhood” taste. It can be modified with add-ins as you please. Be sure to write down what you do as you go, in case tweaking is needed next time or in case you pronounce the latest batch a sure winner. Have plenty of tasting spoons at the ready while churning, and several rubber spatulas will come in handy.As many have noted, it’s key to have the canister frozen rock-solid prior to churning. We keep it in the freezer between uses and even put the plastic shell (aka “lid”) in there while prepping the custard. There’s no actual lid as you might imagine. I wring out a wet dish towel and lay it on top across the open hole, and put some ice cubes atop that to help insulate. May not be necessary, but every bit helps.So far the “21” has worked great and we make a batch every other day. The most challenging part is transferring the just-frozen custard to a storage container for additional hardening. Take out the paddle first and scrape it off (another opportunity for tasting). The filled canister is heavy and to hold it with one hand while scraping out the soft ice cream is a bit unwieldy. A very firm plastic spatula works best (rather than a flexible one) to get all the ice cream out. Never use metal, anywhere, anytime! Wash and dry the canister when empty and return to your freezer pronto. You WILL want more ice cream soon and it’ll be ready to go, so keep a spot empty for it. It’ll be worth it. (I scream for green beans? Not so much….)Some have complained about the freezer not working for long, but being a new owner, I can’t say.. It seems like if you treat the parts gently it would last “forever,” but maybe that’s just like the honeymoon phase with a new lover. Time will tell but we’re very happy for now—even obsessed.Be cautious of OVER-filling the container which can cause an overflow mess since the mixture expands while freezing. Err on being conservative with the amount of custard mix. I use 2 eggs per 3 to 3-1/2 cups of liquid per batch and add the mixings the last few minutes to help ensure they don’t add too much volume. Keep an eye on it from time to time during the freezing process to make sure it isn’t about to overflow. You can always remove some of the mixture if it seems necessary. In the case of the toasted buttered pecans, I folded most of them into the mixture AFTER pouring it into the storage container because instructions say not to add anything larger than a chocolate chip, and I wanted some to be larger chunks. This delayed-addition technique works well for other fixings, too. On one hand, adding pureed fruits at the outset is good, for overall flavor intensity, but adding extra cut-up fruit later may be to your liking. Be aware that too-large chunks will likely get icy in the long run and be hard to scoop up, so there’s a fine line.The other “misteake” was making a double portion of custard in order to have back-to-back batches of half vanilla, intending to make another flavor with the remaining half of the mixture. Apparently the second half of the custard wasn’t chilled enough to overcome the freezing canister having gotten warmer on the first run. Although most batches froze in 15 to 30 minutes max, after a longer time it was obvious this batch refused to set up, so I returned the chilled custard in a bowl in the refrigerator, returned the canister to the freezer and decided to try again later. About five hours worked. Lesson learned—be patient. OK to double the batch, but chill it all thoroughly prior to churning.If pondering whether to get a countertop ice cream freezer, go for it. It’s fun and easy to use. You’ll be a proud as a brand-new parent after you make the first batch.
ホイッパーで混ぜながら凍らせて…で作るアイスに限界を感じたので購入シンプルなオンオフのボタンのみの作りで分かりやすく使いやすかったシンブルなバニラアイスも好評で今後もつ買い続けていきたい
a wowza repeat. I had a older (+20yrs )version of this ice cream maker but unwisely gave it away, when I was downsizing to move a couple of years ago. Even though I’m going to have to dispose of something in my kitchen storage space to make room for it, I’ve missed it so much I decided to replace it with this newer model. It is SO EASY to use and is almost failsafe. I use it when I’m having company: I’ll pour in the mixture (whipped up in advance and refrigerated), just as we’re sitting down for the main course….and Wowzah!….homemade ice cream for desert! It never fails to astonish and please my guests. This very reasonably priced machine is compact and easy to store and to clean–I just keep the bowl in the freezer, so it’s ready to use, when I get the urge. I also like that it only makes a small amount, because then I don’t have much (if any) left over after serving it to company. I’ve even found some very tasty sorbet recipes which I can whip up and indulge in without feeling guilty. The accompanying instruction book has some very good recipes and lots of helpful hints/tips for experimenting with ingredients and potential substitutes (e.g., for heavy cream or milk products). And because of the small capacity, one doesn’t feel that it’s too wasteful to experiment and try alternatives. Almost everything I’ve tried is so much better than “store-bought” ice cream, because I control what goes into the ingredients and I can serve immediately after it’s made. (which by the way only takes 15-20 minutes, depending on one’s preferred softness). Lastly, because it’s a pretty simple machine with limited parts, it stands up to long-term use. After all, my +20 yr old one was still in perfect working condition, when I unwisely gave it away!
Edito porque en el quinto uso ha empezado a hacer un sonido extraño el motor, no tengo mucho usándolo, le quitaré una estrella esperando que sea algo poco común, pero si el motor se descompone lamentablemente ya pasé mi mes de garantía con Amazon.Reseña original:Es un producto simple pero funciona y lo más importante facilita la creación de un helado casero con textura de uno profesional, vale la pena.Funcionamiento.Es sencillo, se debe enfriar en el congelador el vaso de aluminio que trae el producto, dentro del vaso trae un líquido que ayuda a mantener el frio por 20 minutos mientras creas el helado. Enciendes el aparato con tu mezcla y en 20 minutos máximo quedará tu helado.Un día completo se debe enfriar el vaso para mejor resultado, trae un recetario pero básicamente todos los helados del recetario necesitan de crema para batir, este ingrediente sirve para darle cremosidad al helado, también puedes hacer a base de agua, de hecho fue el primero que hice, uno de limón y quedó delicioso, queda como el del cine de la marca ice.Consejo para mejores resultados.Los ingredientes los puedes elegir, no tienen gran ciencia, lo que si te recomiendo es enfriar tu mezcla casi el mismo tiempo que el vaso (solo que no en el congelador, sino en la parte del refri, debe estar frío pero no congelado).Una vez que haya pasado un día frío el vaso y tu mezcla de helado, sólo resta poner los ingredientes en el producto y encenderlo, en 20 minutos máximo quedará listo.Funcionamiento.Lo que hace el producto es darle vuelta al vaso y tiene una pala que se encuentra ligeramente separado del vaso, al estar frío se congela una capa fina de la mezcla sobre el vaso y la pala lo separa, de esta forma le da una consistencia muy fina al helado, después de mucho giros empieza a solidificarse, si quieres mayor dureza te recomiendo congelarlo por 2 horas posteriormente de hacerlo con la máquina, si puedes dejarlo un día más en el congelador es mejor, porque si lo consumes inmediatamente se hace agua al instante, no se disfruta igual. Así que básicamente debes hacerlo con 2 días de anticipación. Un día para crear y helado y otro día para que se haga lo suficientemente duro para disfrutarlo con calma.ExtrasPuedes agregar sólidos a tu helado como galletas, fruta, chispas de chocolate, etc, de agregan 2 minutos antes de terminar los 20 minutos para que quede bien integrado. Puedes hacer cualquier cosa que tú imaginación desee.Consejo final.El vaso es de litro y medio, pero no debes poner esa cantidad de líquido porque expande, así que te recomiendo poner máximo un litro y verás cómo fácilmente se llena el vaso al límite. Si después de 20 minutos no se hizo duro es porque le faltó más frío al vaso y al líquido, no creas que con dejarlo más tiempo lo logrará porque pasados los 20 minutos el vaso empieza a calentarse.Ruido.Realmente no hace mucho ruido, mientras más espeso es la mezcla, se escucha que el motor trabaja más pero nada como para preocuparse. Debes cuidar muy bien el vaso, para evitar que se abolle o tenga fugas, supongo que el líquido que tiene el vaso no es apto para consumo humano y no quieres perforar el vaso y se impregne tu helado de esa sustancia.Conclusiones.Los resultados son muy buenos y el único inconveniente es el día que necesitas enfriar el vaso y después otro día para enfriar tu helado si deseas que quedé mucho mejor. Vale la pena la espera. Si sigues estos consejos no tendrás problemas.Estaba por adquirir el otro modelo de 2 litros pero la verdad no vale la pena porque el precio casi se duplica por sólo medio litro más, puedes hacer tu helado y guardarlo en el congelador por días, pero no te recomiendo que lo dejes más de una semana porque empieza a cristalizarse especialmente los que no tengan crema para batir, por ejemplo hice uno de yogurt de fresa, sólo compré el yogurt le puse más azúcar, lo revolví muy bien para evitar que se sienta los granos de azúcar y agregué pedazos de fresa, quedó cremoso y sin crema batida.Pocas veces califico con 5 estrellas.Espero que mi reseña te sea útil.
Realmente me ha gustado, es práctico y sencillo de usar. Para mí una buena compra.
Me gusta, funcional
It’s ok, good for the price. Summary: It is a decent product that will make good ice cream (if you have good recipes) in a relatively short amount of time (20 minutes). However, you can’t truly walk away and it does need some babysitting. Additionally, cleaning the frozen bowl can be a hassle as it leaves a thing frozen layer behind. However I would still recommend over more expensive products such as the ninja.Pros: easy to set up: it is only three pieces that go together with no effort. Quick, with a frozen bowl it will only take about 20 minutes to get your desired consistency. Can make enough for 3-4 people. Outside the frozen bowl you don’t need to prep ingredients.Cons: it is still a little loud but not to bad. The biggest con is that while it is mixing it tends to pile up on the mixer and will need pushed back down to be mixed and this happens as soon as it starts to freeze. Another con is if you have a thicker ice cream and you stop it and remove the paddle to get the ingredients back to the bottom it will have a very hard time restarting if it can start at all. The easiest way to clean it I found is to let the frozen layer that is stuck on the sides to just melt and then hand wash it.Other: you have to freeze the bowl for 24 hours which is pretty long but it’s not to bad since you don’t need to freeze ingredients. Also the bowl is hand wash only and not dishwasher safe but it’s not bad to clean once it’s less frozen.
Nice machine. This is dangerously easy to use! It makes great ice cream fast, it’s quite, perfect size for just a few people or to have a couple servings in freezer for a sweet treat. I’m happy with it.
Great wedding gift. From the bride, “This ice cream maker is fantastic! Super easy to use, and the results are delicious every time. The machine freezes quickly, and you can make a batch of ice cream in under 30 minutes. I love that you can customize your flavors and ingredients—perfect for experimenting! Cleanup is a breeze, and it’s compact enough to store easily. Definitely a fun addition to our kitchen and well worth the price!”
Great wedding gift. From the bride, “This ice cream maker is fantastic! Super easy to use, and the results are delicious every time. The machine freezes quickly, and you can make a batch of ice cream in under 30 minutes. I love that you can customize your flavors and ingredients—perfect for experimenting! Cleanup is a breeze, and it’s compact enough to store easily. Definitely a fun addition to our kitchen and well worth the price!”
Easy to use. The instructions are easy to use. The ice cream turned out great the first time. Expected noise level but doesn’t take long to make a batch. Very durable and nice looking if you leave on counter as fits well and has great capacity for one or two people.
A true gem. This is the perfect ice cream machine! I’ve made so many different frozen treats since I bought this and they’ve all turned out marvelously!The taste of pure ingredients shine through. It’s so easy to use too. You freeze the bowl a day or two before. Then you mix your ingredients, refrigerate overnight. The next day, you pop your ice cream canister onto the base, add the paddle, lock in the lid, turn on the machine and pour in your yummy ingredients. Fifteen minutes later, voila, you’ve got yourself some yummy ice cream! Buttered pecan is a house favorite here. I’ve made it at least five times so far!! I’ve also made sorbets and they’ve turned out just as great! The machine is really pretty quiet and it’s small enough that it doesn’t take up much space.
Quick and tasty. We bought this for a family member with some rigid dietary constraints. He could not buy ice cream from a store and really missed it. We followed directions about freezing the cylinder for 24 hours before using. We used a recipe that met his needs and within 20 minutes after loading the ice cream machine, we had ice cream. He loved it! Promised to make some sorbet next time. This product couldn’t be better! Works like a charm, just follow directions!
Excelente producto, cumple con mis expectativas
Great for keto/carnivore ice cream. This is a great little ice cream maker for my purposes eating carnivore. It’s a little noisy, sounds a bit like an older bread machine that self kneads the dough. It’s not the worst, especially for the amazing end result.***MAKE SURE THE MIXING PADDLE IS ALREADY IN THE MACHINE AND THE MACHINE IS TURNED ON BEFORE POURING ANYTHING IN***There is definitely a learning curve with it. I’m using it for a sugar free keto/carnivore ice cream recipe (2 cups heavy cream+5 egg yolks+vanilla extract+some stevia sweetener). Do yourself a favor fellow carnivores and thoroughly beat all your ingredients with a hand mixer for a few minutes until smooth, THEN pour it into the ice cream machine. It comes out DELICIOUS and creamy, better than anything store bought.I had perfect frozen custard within about 12 minutes, and the ice cream barrel had been in the freezer for about 17 hours before I placed it on the machine. Just shake it first to make sure it’s frozen solid and there’s no sloshing within the barrel. It gets a really even cold surface and evenly freezes the ingredients, awesome end result for a budget ice cream maker.Since you can’t put the barrel in the dishwasher, Easiest way I’ve found to clean it is just let it sit out for a few hours to melt all the residue off the sides, then wash it out with antibacterial dawn. Let the churning paddle sit in the barrel full of soapy water and swish it around to clean it simultaneously, then dry it off and pop it back in the freezer so it’s ready next time you’re wanting a frozen treat.My only gripe with it is that the churning paddle is plastic, would’ve preferred metal, but it works well enough once locked into place.
Better than I expected. I bought this because I wanted to try making my own ice cream. After making a test batch of chocolate ice cream I don’t think I’ll purchase store bought ice cream again. The quality of the ice cream is awesome, smooth and creamy.This is a heavy sturdy product, the freezer bowl has some weight to it. The paddle is made of plastic, I would prefer it be metal but at this price point it makes sense it’s plastic. There have been some comments on the noise level, but I don’t feel it’s overly loud. From the comments I’ve read and videos I’ve seen it much quitter than I expected.The recipes that come with the manual are the best place to start. The Chocolate ice cream recipe is really good and was a great starting point. Additionally, they can be modified. I used the Strawberry ice cream recipe as a base for making Cherry and Blue Berry Ice cream and they turned out great.I would say that these recipes will make a bit more than 1.5qt., as another reviewer commented you only want to fille the freezer bowl to about three quarters of the way to allow to the ice cream to expand. So using the recipes will over-flow the bowl once the ice cream starts to solidify.Overall I’d say it’s well worth it.
Repeat Buyer–But Know These Things. Ordered this to replace my 20 year old cuisinart ice cream maker. The fluid in the freezing bowl walls for my old machine would no longer freeze and they no longer make replacement bowls for that model. This new machine was SIGNIFICANTLY lighter than my old machine–love that. The only downside is that the power cord in the new machine is much shorter–maybe 1 1/2 feet. Other than that, the machine is quiet and works perfectly.Here are some basic things to know about this machine. 1. You must put the freezing bowl in the freezer the night before you plan to make your ice cream. 2. Once the fluid in the freezer bowl wall is frozen, you add your batter and run the machine for 15-20 minutes. The machine churns and freezes your batter while sitting on your counter top for that time. 3. Once “done” you need to transfer your ice cream to a freezer storage bowl and freeze for at least 2 hours to get the ice cream to a good frozen texture. 4. It only makes 1 quart at a time. Bottom line is you must plan ahead. This said, the process requires very little active work. Literally maybe 5 minutes to wisk up the batter and 3 minutes to transfer it to your storage container. Super simple.Once last recommendation–I would highly suggest using ONLY cold water to wash the freezer bowl after use. The directions say use only lukewarm water, but from reading other recommendations and my own experience with a failed freezer bowl (in fairness, not used often but lasted 20 years), using only cold water to clean the bowl will help to preserve the life of the coolant in the bowl walls.